Traditional predefined deployment environments such as dev, test, stage, and prod are limited in providing fast feedback loops.
To improve developers’ and end-user experiences, companies like Vercel , AWS , Netlify , and many more offer the functionality for deploying apps to dynamic environments.
In this tutorial, you will build preview environments on AWS using Terraform CDK and deploy a React application.
The source code is available on Github.
GitHub - almmiko/aws-previews-deployment: Build AWS Infrastructure for Preview Environments
The AWS infrastructure for showcasing How to Build Preview Environments for Modern CI/CD Workflows Using Terraform CDK…
github.com
If you do not have Terraform and CDKTF installed on your system and configured AWS credentials, follow the prerequisites sections to install it before you continue with this tutorial.
Prerequisites
To follow this tutorial you will need:
- AWS CLI installed
- AWS account and AWS credentials that allow you to create resources programmatically
- Terraform v1.0+
- CDK for Terraform v0.9+
Solution Overview
Creating end-to-end functionality for preview environments includes building CI/CD workflow and infrastructure for hosting application build versions.
This tutorial will focus on building the infrastructure part that allows using wildcard domain name created using AWS Route53 to route traffic to application versions stored in the AWS S3 bucket.
You will use AWS CloudFront CDN that exposes the AWS S3 bucket to the outside world and allow you to utilize Lambda@Edge for creating redirect logic.
Lambda@Edge is associated with CloudFront as origin-request will intercept the requests and redirects them to the correct path (folder) on the AWS S3 bucket.
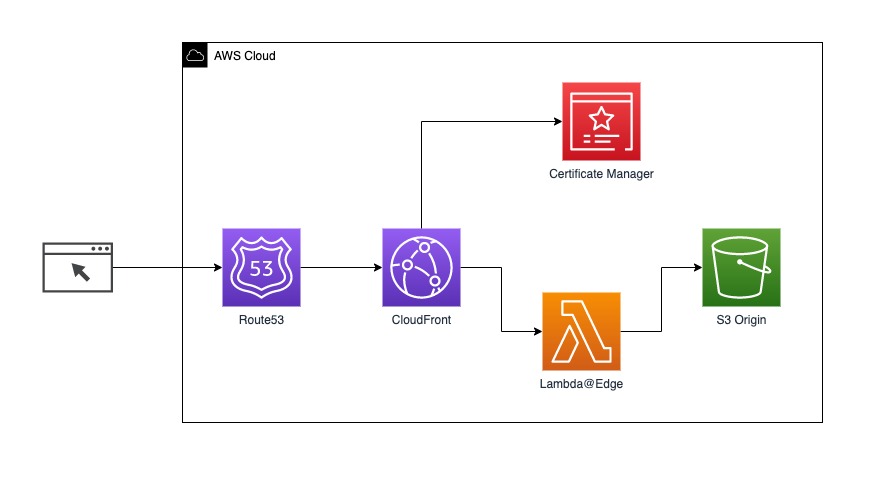
The final result you will get after completing this tutorial.
Provision AWS Resources
You’ll be using the following resources:
- Amazon S3 for the web app storage
- Amazon CloudFront for accessing S3 website from CDN
- Lambda@Edge for URL rewrites
- Route 53 for managing DNS records
S3
Let’s create a root S3 bucket. The bucket will have subfolders that represent copies of the deployed application.
const bucket = new s3.S3Bucket(this, "aws_s3_bucket", {
  bucket: configuration.BUCKET_NAME,
});
You will create the bucket that is publicly accessible with read-public ACL. You also can make it private and allow access only from CloudFront.
new s3.S3BucketAcl(this, "aws_s3_acl", {
  bucket: bucket.bucket,
  acl: "public-read",
});

const bucket_website = new s3.S3BucketWebsiteConfiguration(
  this,
  "aws_s3_bucket_website_configuration",
  {
    bucket: bucket.bucket,
    indexDocument: {
      suffix: "index.html",
    },
  }
);
Certificate Manager
The HTTPS encryption certificates are managed with AWS Certificate Manager ; the next step is to create an ACM certificate.
AWS CloudFront doesn’t support multiple ACM certificates per distribution; see associate SSL certificates cloudfront .
To resolve this limitation and use CloudFront distribution with a wildcard domain name, you need to create an ACM valid certificate for the root domain (example.com) and the wildcard subdomains (*.example.com).
const acmCert = new acm.AcmCertificate(this, "aws_acm_certificate", {
  domainName: "example.com",
  subjectAlternativeNames: ["*.example.com"],
  validationMethod: "DNS",
});
AWS Route53 automatically verifies that you own provided domain name with validationMethod: "DNS"
const route53Record = new route53.Route53Record(this, "aws_route53_record", {
  name: acmCert.domainValidationOptions("0").resourceRecordName,
  type: acmCert.domainValidationOptions("0").resourceRecordType,
  records: [acmCert.domainValidationOptions("0").resourceRecordValue],
  zoneId: zone.zoneId,
  ttl: 60,
  allowOverwrite: true,
});
The next step is to request the DNS validated certificate with required validation records and wait for validation to complete.
new acm.AcmCertificateValidation(this, "aws_acm_certificate_validation", {
  certificateArn: acmCert.arn,
  validationRecordFqdns: [route53Record.fqdn],
});
Route53
To route traffic to your CloudFront distribution, you need to create a record in Route53 as a wildcard domain name and link the domain name as an alias with your CloudFront distribution.
new route53.Route53Record(this, "aws_route53_record_wildcard", {
  zoneId: zone.zoneId,
  name: configuration.WILCARD_DOMAIN_NAME,
  type: "A",
  alias: [
    {
      name: cloudfrontDistribution.domainName,
      zoneId: cloudfrontDistribution.hostedZoneId,
      evaluateTargetHealth: false,
    },
  ],
});
Lambda@Edge
You need to provision resources and bundle the lambda code before you create Lambda@Edge itself and associate it with CloudFront as origin-request.
const lambdaAsset = new TerraformAsset(this, "cf-origin-lambda", {
  path: path.resolve(__dirname + "/../lambda/origin-request"),
  type: AssetType.ARCHIVE,
});

const lambdaBucket = new s3.S3Bucket(this, "aws_bucket_for_lambda", {
  bucket: "cf-lambda-origin-req",
});

const lambdaArchive = new s3.S3Object(this, "aws_lambda_origin_req_archive", {
  bucket: lambdaBucket.bucket,
  key: `${lambdaAsset.fileName}`,
  source: lambdaAsset.path,
});

const lambdaRole = new iam.IamRole(this, "lambda_role", {
  name: "cf-origin-request-lambda-role",
  assumeRolePolicy: `{
            "Version": "2012-10-17",
            "Statement": [
              {
                "Action": "sts:AssumeRole",
                "Principal": {
                  "Service": ["lambda.amazonaws.com", "edgelambda.amazonaws.com"]
                },
                "Effect": "Allow"
              }
            ]
        }`,
});

new iam.IamRolePolicyAttachment(this, "lambda_logs", {
  policyArn: "arn:aws:iam::aws:policy/CloudWatchLogsFullAccess",
  role: lambdaRole.name,
});

const lambdaEdgeOriginReq = new lambdafunction.LambdaFunction(
  this,
  "aws_lambda_origin_request",
  {
    functionName: "cf_origin_request_lambda",
    role: lambdaRole.arn,
    s3Bucket: lambdaBucket.bucket,
    s3Key: lambdaArchive.key,
    handler: "index.handler",
    runtime: "nodejs14.x",
    publish: true,
    sourceCodeHash: lambdaAsset.assetHash,
  }
);
CloudFront
The central point of connecting multiple components plays AWS CloudFront. AWS CloudFront provides viewerCertificate configuration block and
aliases to support wildcard domains. Use AWS ACM certificate for viewerCertificate configuration.
For handling incoming requests, AWS CloudFront uses Lambda@Edge. Lambda@Edge is a lambda function replicated globally and operated on the CDN Edge.
To create the preview environments, you need to create Lambda@Edge that is attached to CloudFront’s Origin Request Event (eventType: "origin-request").
You can also create CloudFront’s Viewer request lambda to capture and propagate x-forwarded-host, but it’s no longer needed. Instead, you will use CloudfrontCachePolicy. With CloudFront Cache Policy, you create allow list for headers, queries, and cookies and forward them to the Origin.
const cfCachePolicy = new cloudfront.CloudfrontCachePolicy(
  this,
  "aws_cloudfront_cache_policy",
  {
    name: "headers-forward-policy",
    parametersInCacheKeyAndForwardedToOrigin: {
      headersConfig: {
        headerBehavior: "whitelist",
        headers: {
          items: ["Host", "Origin", "Referer"],
        },
      },
      queryStringsConfig: {
        queryStringBehavior: "none",
      },
      cookiesConfig: {
        cookieBehavior: "none",
      },
    },
  }
);

const cloudfrontDistribution = new cloudfront.CloudfrontDistribution(
  this,
  "aws_cloudfront_distribution",
  {
    enabled: true,
    dependsOn: [bucket],
    isIpv6Enabled: true,
    aliases: [configuration.WILCARD_DOMAIN_NAME],
    defaultRootObject: "index.html",
    origin: [
      {
        domainName: bucket_website.websiteEndpoint,
        originId: "aws-deployment-previews",
        customOriginConfig: {
          httpPort: 80,
          httpsPort: 443,
          originProtocolPolicy: "http-only",
          originSslProtocols: ["TLSv1", "TLSv1.1", "TLSv1.2"],
        },
      },
    ],
    defaultCacheBehavior: {
      cachePolicyId: cfCachePolicy.id,
      allowedMethods: [
        "HEAD",
        "DELETE",
        "GET",
        "OPTIONS",
        "PATCH",
        "POST",
        "PUT",
      ],
      cachedMethods: ["GET", "HEAD"],
      targetOriginId: "aws-deployment-previews",
      viewerProtocolPolicy: "redirect-to-https",
      lambdaFunctionAssociation: [
        {
          lambdaArn: lambdaEdgeOriginReq.qualifiedArn,
          eventType: "origin-request",
          includeBody: false,
        },
      ],
    },
    restrictions: {
      geoRestriction: {
        restrictionType: "none",
      },
    },
    viewerCertificate: {
      acmCertificateArn: acmCert.arn,
      sslSupportMethod: "sni-only",
      minimumProtocolVersion: "TLSv1.1_2016",
    },
  }
);
The origin-request lambda intercepts the incoming request to the S3 origin and modifies the request path to route the request to the correct subfolder.
exports.handler = (event, context, callback) => {
  const { request } = event.Records[0].cf;

  const branch = request.headers.host[0].value.match(/[^\.]+/)[0];

  request.origin.custom.path = `/${branch}`;

  request.headers.host = [
    { key: "host", value: request.origin.custom.domainName },
  ];

  return callback(null, request);
};
Deploy a React App
As a part of this tutorial, you will deploy a React App. The code you can find in aws-previews-deployment . You also can pick any other Front-end framework.
The first step is to build React App, run cd app && npm run build.
In terraform/utils, use your AWS credentials and replace placeholder values.
After you provisioned AWS infrastructure and created the application PROD build, you can run npm run s3:upload. This command will upload app/build folder to AWS S3.
async function upload() {
  // We used app/build as a dist folder with the application.
  const pattern = path.resolve(__dirname + "/../../app/build");
  const files = glob.sync(`${pattern}/**/*`, { absolute: false, nodir: true });

  for (const file of files) {
    const content = fs.readFileSync(file);

    const upload = {
      Bucket: "aws-deployment-previews-root",
      Key: file.replace(`${pattern}/`, `${PREVIEW_PATH}/`),
      Body: content,
      ACL: "public-read",
      ContentType: mimeTypes.contentType(path.extname(file)),
    };

    await s3Client.send(new PutObjectCommand(upload));
  }
}
Clean up Resources
When done with this tutorial, use the npm run destroy command to remove provisioned resources.
Lambda@Edge can’t be destroyed in one run; wait until AWS removes replicas and re-run destroy command.
Wrapping up
Congratulations! You successfully created preview environments on AWS using Terraform CDK.
You learned how to provision and deploy AWS CloudFront, Route53, S3, and Lambda@Edge with Terraform CDK.